
Hello there everyone!
Happy Friday!
Are you all ready for the weekend?
Whatever you're doing ~ I hope you
have fun!
I seriously cannot believe
it is almost the middle of September....
wow!
~*~
You may remember my post not
too long ago regarding the tufted
headboard...??
{click here to read about it}
so I wasn't loving it~ nope ~
just wasn't liking the chenille
or the shape....
so I started over.......
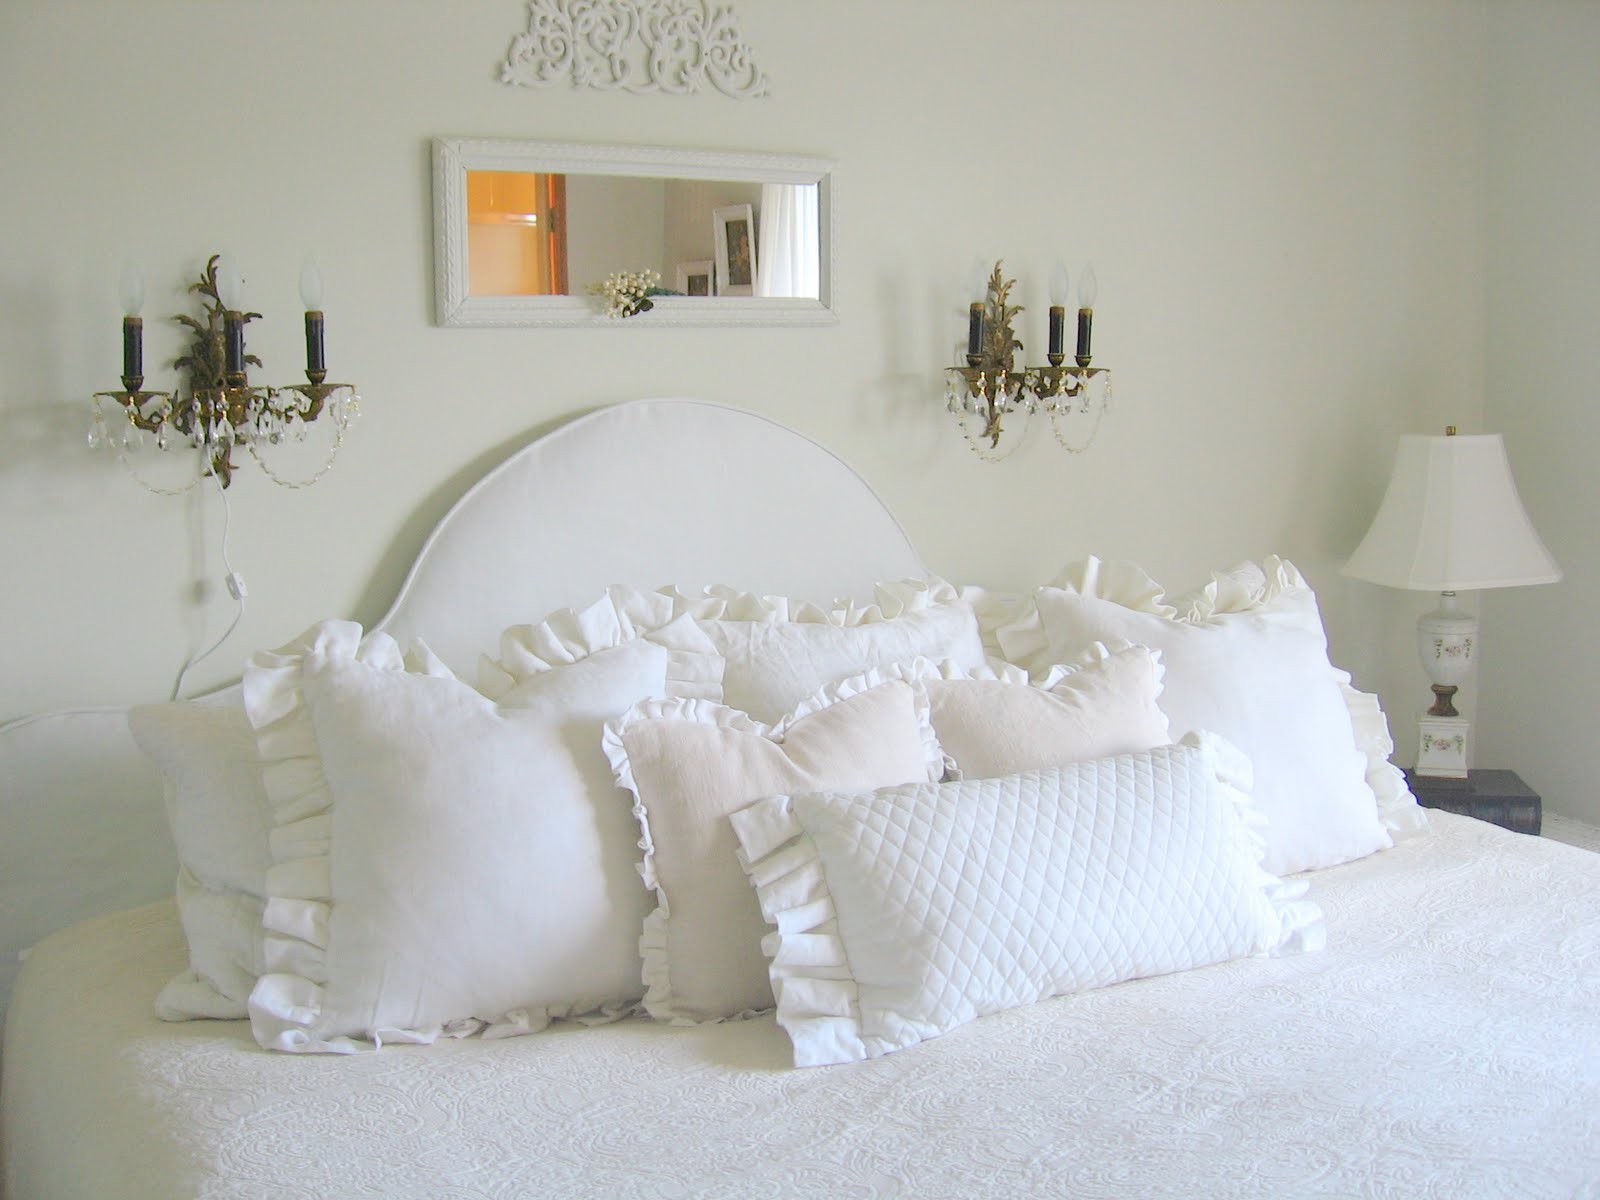
and this is the current and
latest version of our headboard...
slipcovered in white....
I know it seems absolutely nutty
to completely scrap the first &
start ALL over again.....but.....
I'm so glad I did.
so here's the process....
{in case you get the urge....}
It basically starts the same as the tufted headboard ~
you need some plywood & a shape
you like....
This was my inspiration photo ~
love this room!!
{& the house that goes with it for that matter....
click here to see the whole house}

I painstakingly drew my design....
{used various household items to try to get
the shape just right}
and traced it onto my plywood
{hmmmm, I do believe that is a pile of laundry
on the couch back there......}

now it's time for the batting...again...
roll it out & staple it on

pre-wash your fabric and get ready to pin!
big hint: if you don't want seams
down both sides in the middle
like I did.....*cough cough*
make sure you buy enough fabric.....ahem....
;)
but since I was in a hurry
because I had already spent
so much time on headboard #1
I decided to live with it......hence
the seams.....

so for this step just lay your fabric over
the headboard & loosely cut around
the shape....at this time it's not about precision,
it's about cutting off all the bulky extra fabric you
don't need.
now once you get all the excess trimmed off ~
you pin it into place for a snug fit...

now that you've got it pinned into shape
and smoothed out ~
*note *
I chose not to cover the back in the same fabric....
knowing it would be against a wall, I covered the back in a lightweight white bedsheet.
{el cheapo, ya know}
so at this point you can just stitch the 2 sides together,
or you can decide to add piping like I did ~
I love me some piping...
so off to the sewing machine....
if you'd like to know how to do piping...
click here for a look

pin the piping on &
stitch it in place and voila!
headboard is done!
ok....not really....
but this is where the tutorial pictures end.....
well....I musta got hasty and just forgot
to take the rest....whoops!

this is what we did: (Mr. T & T~ and I supervised...;)
we picked up an 8 foot 1x4 and cut it
in two. We eyeballed (is that a real word?)
about how high we wanted the headboard to
sit & screwed the 1x4's into the back one
on each side.
Then just slipped the cover over the headboard
and pushed the bed up against it!
now it's done!

and it's my bedtime....
good night all!
xoxo,
Shellagh


.jpg)


40 comments:
You're just so amazingly creative, Shellagh! I understand it bugging you so much you had to start over...done it before myself! So glad you're happy with it now--it's beautiful! I know you'll enjoy pleasant dreams there now!
Have a beautiful weekend!
Julie
V-ery elegant!
Well done Shellagh. Makes me want to have a go myself!
Irene x
Wow Shellagh, it is absolutely beautiful, as always!! I also understand about changing it if it was bothering you. Enjoy your gorgeous new headboard and wishing you sweet dreams ~ x
Looove your headboard, pillows & sconces! Eyeballed is sure in my vocabulary! But then again, I think we could write our own blogging dictionary, especially for all of us that love to blog about our love of cottage decor and what we do to achieve our own individual 'cottage' look! Thanks so much for sharing this with us. I love that you also use different fabric for the unseen parts! You're a gal after my own heart! Debbie @ Cottage Hann~Me~Downs
WOW its beautiful!!
What a verry verry nice job!!
I love your pillows alsow! Wishing you a wunderful night
Yolanda
You make it sound so easy! I just love that someone else also forgets, occasionally, to remove the laundry!
The bed look so cosy and pretty
It is beautiful! I've been upholstering a headboard and footboard all week too for my booth. Blah! , of course, did not remember to take pictures for my blog. Back down to the antique mall tomorrow. Yes, and your pillows on your bed are to die for!!! Lovely, lovely, lovely. Your buddy in Tuscaloosa, Sue
Your headboard and bed looks beautiful and very comfy!
Hi Shellagh, Your headboard is just perfect and your bedroom. I haven't been here for a while so I have spent this morning reading some posts that I have missed. You are one talented girl and I love your style!
Enjoy your weekend,
KarenSue
Hey Shellagh..The headboard turned out perfect!I'm not a perfectionist by any means, but when something's off it makes me a little nuts til I fix it! I still don't know when you find the time to get it all done...Oh yes, now I remember, your still young!
Blessings,
Susie
I'm visiting Chicago
this weekend and told
my friend about this
very project and how
easy you made it seem!
She doesn't have a
headboard in her guest
room and I think it
would add soooo much.
Thanks, as always, for
sharing your creative
process, Shellagh!
xx Suzanne
Your headboard turned out great. I know what you mean about having to redo something if you're not loving it, I'm the same way. Love all your pillows...looks very cozy :)
Beautiful Shellagh! I've said it before and I'll say it again you are so darn talented! =)
The whole headboard sounds like ALOT of work. You are a patient woman! But I must say it is one of the loveliest headboards I have ever seen!!!! Besides being beautiful, stunning, and gorgeous I would guess that it is pretty comfy too, for sitting up and reading in bed. I just love your creations Shellagh!
Hugs, Lisa
I always think it is worth doint a project over, until I really like it.
Hey, Shellagh ~ the sun it out - yipee.
Fondly,
Glenda
wish I had the energy to start the guest room .... the back porch knocked me over!!
you're a sewing "machine"
hahahah
hello shellagh! your blog always inspires me, but I don't think I can ever be at par with your talents! thanks for sharing this project. hope you are enjoying your weekend. verbena cottage verbena cottage
Hi Shellagh! Wow! I love your bed! I haven't seen a lot of your posts so I have to go and catch up reading. Glad I visited, Enjoy the weekend! Maureen
Hi Shellagh! You know how much I love your beautiful bedroom! I love your headboard! That feature in Country Home or Country Living (?) was so inspirational to me, too... loved it and saved the pictures. You did a fabulous job recreating the look! It was so nice of you to take the time to do a tutorial. I know I've said it before, but I wish I knew how to sew! Oh well... what can you do? :)
Have a great weekend!
Hugs ~ Jo
GORGEOUS! GORGEOUS! GORGEOUS!
Have a pretty day!
Kristin
I can see you wasted no time getting this the headboard the way you wanted it. And, it's stunningly gorgeous! I love it. Your bed looks beautiful with the headboard and all the lovely pillows and bedding.
hugs
Sissie
Really turned out pretty Shellagh! Sometimes we just need to make a "test" before we get it right or in your case what we really like the most. You do a great job with your projects and thanks for the tutorial!~Hugs, Patti
Hello Shellagh, Your headboard turned out so cool!
I too love your inspiration room. I think it's funny because I have seen that same room as others inspiration as well. I wonder who it belongs to, and I wonder if they are even aware of how sweet that little room is to so many people! Marcia
Piping is my worst nightmare, but it just makes stuff look so much better...more upscale and finished. LOVE this headboard, and am considering something like this for my daughter's bed (if she'll let me!).
Beautiful...prettiest bedroom in blogland.
i love this idea! i am getting ready to redo my girls room. inspired! :)
Love it! smiles...
Hi Shellagh,
I so remember this beatiful make over you gave your room. I am getting ready to make a slip cover for and iron bed, one that tie's on. It will give it a new feel and look to it. I will let little details peek-a-boo through :)
loving your passion
xoxo
Dore
Shellagh,
Your newest headboard is super gorgeous! Your pillows are also very pretty, along with the accesories, your room is truly a vision of loveliness!
Hugs, Cindy
You are something else Shellagh~ this is just beautiful!!
Hugs~
T
Shellagh, Your headboard is beautiful! You make it sound so easy to make. I would be lost at just drawing the shape!
xo, Sherry
Love this headboard. You are the best for sharing. Your bed looks so comfy and so crisp with the white.
Fabulous redo the headboard looks amazing. Well, your entire bed looks so comfy.
Have you entered my Latest Giveaway from the French Basketeer? I think you will love it!
Karena
Art by Karena
Beautiful!!! I love it!
Gorgerous i just
love this headboard!
Lovely bedroom...very dreamy!
Pamela :)
You are fabulous my Dear! So sweet to share all your grand ideas as well.I am off to the fall show at Monti~Best to you, Kim
Gorgoues....you make it look so easy! Your bedroom is just beautiful!
~Des
Hey Girl!
I have missed you these last few months (if it is possible to miss someone you have not actually met in person and not be labeled "psycho"...I promise, I'm not, just don't ask my 16 year old daughter...)
I have to tell ya, I have been running around like a chicken with my head cut off as on Oct 2, I am hosting a wedding reception in my backyard for about 300 people. I keep seeing beautiful pics that you post, and I think, "I need to do that!" Then off to start of another project. Not as lovely as the ones you feature, but I am trying.
Hope your garden did well this summer. I kept up with mine until August, then we got a hot streak with a ton of rain, and the weeds staged a major coup. They won the battle too.
Have a beautiful fall! Next on my list is a headboard. I am taking your fabric recommendations into consideration!
Kate
Beautiful! I do love the simplicity of this one. I see you have a Brother sewing machine. do you like yours? My husband just bought me one for my birthday. I'm a little intimidated since I've used the same Singer since I was 12 years old (46 years I have had that machine!!!) but it does so many cool things I may have to relearn how to sew!
xox
Hello Shellagh:
This is the first time I've been to your blog and your work is beautiful! I came here because I am currently working on making a slipcover for my own queensize sleighbed. I want to ask your expert opinion: if I don't make any sort of padding for the existing headboard and just simply sew a slipcover that pops over the wood, do you think that would be alright or does it absolutely need the padding to turn out nicely? Also, if it indeed DOES need the padding, do you think it would work to sew the padding onto the slipcover, sort of like a quilt, or do I have to staple the padding material to the existing bed?
Thanks so much for your comment. I'm a first timer at this particular project, but an old hand at DIY, particularly the thrifting kind ;P
Hi Sumiyeh,
Thanks so much for your very sweet comment :)
I would definitely go with the padding. And hopefully this won't damage your sleighbed - but I think in order to give it a luxurious look you are going to want to staple the padding onto the bedframe. I'm just not sure you could get the same look if you padded the cover itself. Hope that helps!
Good luck!!
Shellagh
Post a Comment