
Hello everyone!!
Hope you enjoyed a great holiday
weekend......
our family always loves an extra day....
but I honestly cannot believe tomorrow
is the first day of school....:(
tomorrow morning will be a r.u.d.e
awakening....yikes!
{early mornings=boo!}

awhile back I learned a very handy
transfer method for burlap......
easier than using a stencil....
quicker than fabric paint....
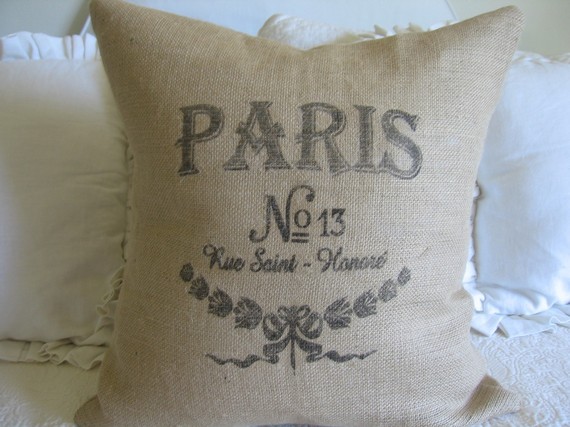
it's the method I use in my linen shoppe
to create the images on pillows such
as this one
it takes just a teeny bit of practice ~
but once you get it the possibilities are
endless!
So here' what you need:
image
burlap
image transfer paper
iron
hard table top
OK....I've tried several types of transfer
paper & this is the ONLY one to use!

it's by Wilton
called Jolee's Easy Image Transfer Paper
"light"
I buy mine at Michael's
seriously, do not waste your money
on other brands unless you want a sticky
nasty mess on your hands! :)
Ok...so throw out their instructions...
hahahaha!
no really!
1) prepare your burlap...iron if necessary
and decide where you want your image
(I use masking tape to secure the burlap in place
so it doesn't shift around on the table)
2) print your image (use the mirror image
in your print preferences if you're using any text)
put the transfer paper in w/ the red line "up"
btw....tons of free graphics at
3) once you've printed your image,
cut around the image as close as you can
while leaving just enough (maybe a centimeter)
around the edges, so you can peel it off after
ironing it on.
4) k...now make sure there's no water
in your iron & it's on the hottest setting
*tip*
if it's a larger image with multiple words
or whatever, cut them out individually....
5) place the image where you want it
& press straight down...(so it doesn't shift around)
once you initially iron it so the glue is activated,
you can move the iron around a bit & make sure
you get every little area of the image....
6) now once you feel pretty confident you've
ironed the whole image down securely....
start to pull off the paper..
*huge tip*
this is where the trick comes in....
very important!!
you will want to iron right where you
start to pull off the paper ~ right before
you pull the paper off...
meaning...the paper has to be super hot
when you start to peel it off or the glue will
show up! I basically keep ironing as I'm pulling
it off....otherwise it doesn't work right!
super hot paper=no glue residue or glossy background!

*one more tip!*
if the paper is hard (at all) to pull off ~ you know you
need to re-iron ie..heat up that section again...
keep it hot baby! ;)
that's it!!
no glue-y residue
no shiny glossy funky "iron on" look
awesome vintage looking graphic on your burlap!
one last thing to remember...do not
iron image after it's created!
Let me know if you give it a try!
Have a great day!!
xoxo,
Shellagh
Shellagh - thanks for your tips. I've been wanting to try this for awhile now but I've been nervous about it. Luckily I already bought the "right" transfer paper at Michaels. J
ReplyDeleteWow!! That's it? Thanks Shellagh. I know I can do this . Hahahhaaa.
ReplyDeleteCheers and thanks for sharing.
Gee
sometimes it just pays to buy it! almost there...I've been browsing a long time!
ReplyDeleteGreat pillows......love from me....xxx...
ReplyDeleteThanks for sharing--the images look great. I have never seen that brand of paper--I will look for it. Thanks!
ReplyDeleteYour pillows are beautiful! Thanks so much for this information! I have always wanted to try iron-on but I don't want it to look like iron on. Thanks for all the tips and tricks you used. I will look for this brand next time I am at Michael's. So excited to give this a try!!
ReplyDeletefantastic tutorial!
ReplyDeleteThank you so much for the wonderful tutorial! I have wanted to try this for a long time but no other tutorial I've read addresses how not to have the glue residue showing. It is such a pet peeve of mine when it shows. :)
ReplyDeleteThanks for going to all the trouble to explain all that- I am going to give this a try and will let you know how it works. Thanks so much- xo Diana
ReplyDeleteYour pillows are beautiful! Thank you for this tip! I am going to try this on some stools I am working on!
ReplyDeletexx
Anne
Wonderful tutorial, sista!! Thanks for sharing the tips! Hugs!
ReplyDeletexoxo laurie
Thanks for the tutorial and the tips. You make it seem so easy. ;-)
ReplyDeletei just want to say THANK YOU THANK YOU THANK YOU!!! Love your pillows can't wait to try some myself!
ReplyDeletehi! nice tutorial! do you know if your method works just as well / the same, for fabrics other than burlap? seems like a silly question, but fabrics are tempermental sometimes! thanx and have a great day!
ReplyDeletetake care!
debra
Thanks for Sharing, Love the stools.. Always amazing pieces you have/do. Hope you'll stop Gracefully Vintage for our Giveaway of our newst messenger/tote bags to celebrate our new web design. xoxo
ReplyDeleteHi Shellagh!
ReplyDeleteWondering what type of burlap you are using??? I have heard there is a difference, and that some burlap is washable and some isn't..? Would be so much fun to give this a try!
Hope the girls (and you!) had a terrific first day of school.: ) My youngest just started kindergarten, and I started feeling weepy the night before!!
Leah: )
You are so generous with sharing your craft, thank you!
ReplyDeleteI wonder what transfer paper is best here in Australia, will have to check it out.
alicia :)
Ohh¡ Its fantastic
ReplyDeleteDo you want to visit my blog?
http://alicia-entrepinturas.blogspot.com.es/2012/08/enredando-un-poquito.html
Thank you so much Shellagh for this tip!!! I am finally trying to learn how to sew and make my own pillows. I make all sorts of stuff out of old and vintage materials but sewing has never been my thing. I cannot seem to find the pillows that I want to sell at my barn sales and I am tired of people charging me a lot of money to make them for me soooo....I am going to start. I also loved your blog on the mom jeans!! I have 4 sons and one daughter who is in her sophomore year of college so she is not around to give me any tidbits of help. the boys could care less what I wear!! Your style is beautiful and inspiring!! How do you do it with 6 daughters?? I started Life's Patina over a year ago and am struggling to keep my head above water with my family. Any advice?? All the best~ Meg from Life's Patina
ReplyDeleteI have wanted to do this and feared it was too complicated. Your directions make it look possible. So I will try it. Thank you soooo much.
ReplyDeleteHello! I followed your tutorial to the letter. Everything worked just as you said to get the transfer paper off.
ReplyDeleteBut when I took it up, the words left only a little bit of black behind and the burlap was scorched. It wouldn't have been so bad but I'm using white burlap. Glad this was a trial run. I'm not ready to give up yet. Was my iron TOO hot?
The second attempt worked better. I used the second to highest setting and had no scorching. However, my design is fairly intricate. Most of what shows up on the burlap is the shape, but doesn't pick up the finer details. So I think I will stick to larger letters and solid shapes when using this method. It's a great idea!
ReplyDeleteSILLY QUESTION, (if you already answered this, IM SORRY) but do you trim the transfer paper around your image or leave it at the 8.5 x 11
ReplyDelete